DIY Natural Stain Remover Recipe
I never knew that a DIY stain remover could change our lives until what my husband and I call The Season of White Baseball Pants. But our natural stain remover has eliminated stains I used to think were impossible to get out.
At first, I was going to be the mom who didn’t care if the pants weren’t perfectly clean. After all – they’re just going to get dirty again, probably before they ever even run on the field. I would sit at the games and listen to moms talk about stain-removing soap, bleach, Shout, Dawn dish soap, etc.
My Attempts at Removing Stains Without Harsh Chemicals
I didn’t own any of those products among my nontoxic cleaning supplies – especially bleach for many reasons. So I would soak the pants for a few hours, wash them with my regular eco-friendly detergent and hang to dry.
They didn’t look great, but they weren’t that bad either.
As the season went on, the stains from grass and dirt (and black bean burritos after the games) were more than even I could take. I knew I wasn’t going to go the harsh chemical stain removal route, but most of the natural stain remover options I’d tried had failed to even fade the grass stain.
I looked online again and read about a mom who took her daughter’s softball pants to the car wash after every game.
“Aha! We have a pressure washer,” I recalled. This could be a chemical-free stain removing option.
My husband and I lined up the baseball pants on the driveway to see if the power sprayer could make a dent in four weeks of stains. Well, it did! Other than some wear and tear on the knees, the pants looked brand new.
I texted the neighbors, “Stop scrubbing and come outside!” Then we all stood around, making astonished statements you only hear on an infomercial. For the rest of the summer, you’d often find a gathering around our driveway, chatting over the hum of the pressure washer as we took turns tackling a line of pants.
Some options weren’t exactly sustainable
Eventually my green guilt crept in, and I admitted that using all that water use wasn’t sustainable. There was also the hassle of dragging out the pressure cleaner, hooking up the hose, and standing outside on a cold March day getting wet from overspray.
So, after much experimenting, I landed on this natural stain removal recipe.
It was a combination of a few hacks I found online and in a DIY cleaning book. I added an extra ingredient (lemon essential oil) since I’ve had luck with it on grout stains.
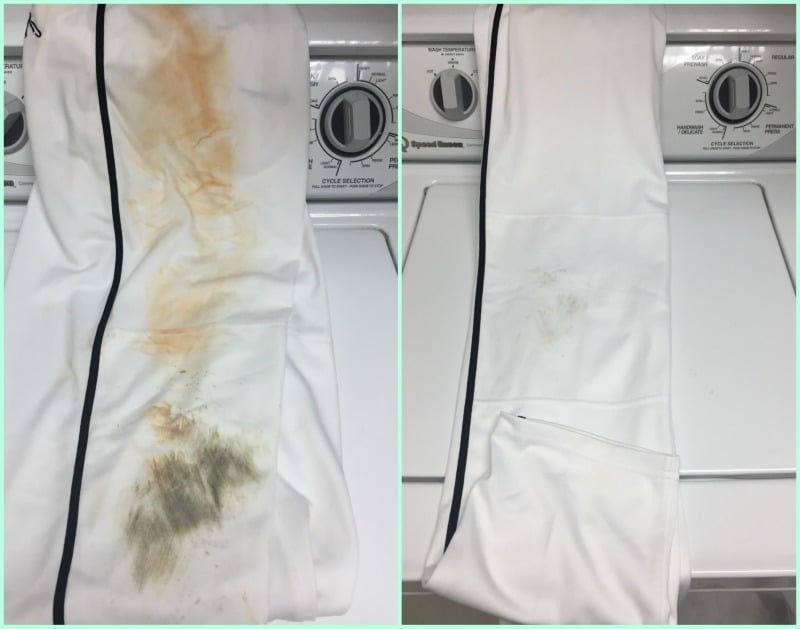
Natural Stain Remover Before and After
Here’s a look at my most recent before and after photos using this DIY natural stain remover. (These were taken at different times of day if you notice a change in the lighting on both the pants and the washing machine.)
I probably could have scrubbed the grass stains a little more, but nearly all of the field dirt came out. Around the seams can be a tricky spot as you can see from the hem.
DIY Stain Remover Recipe
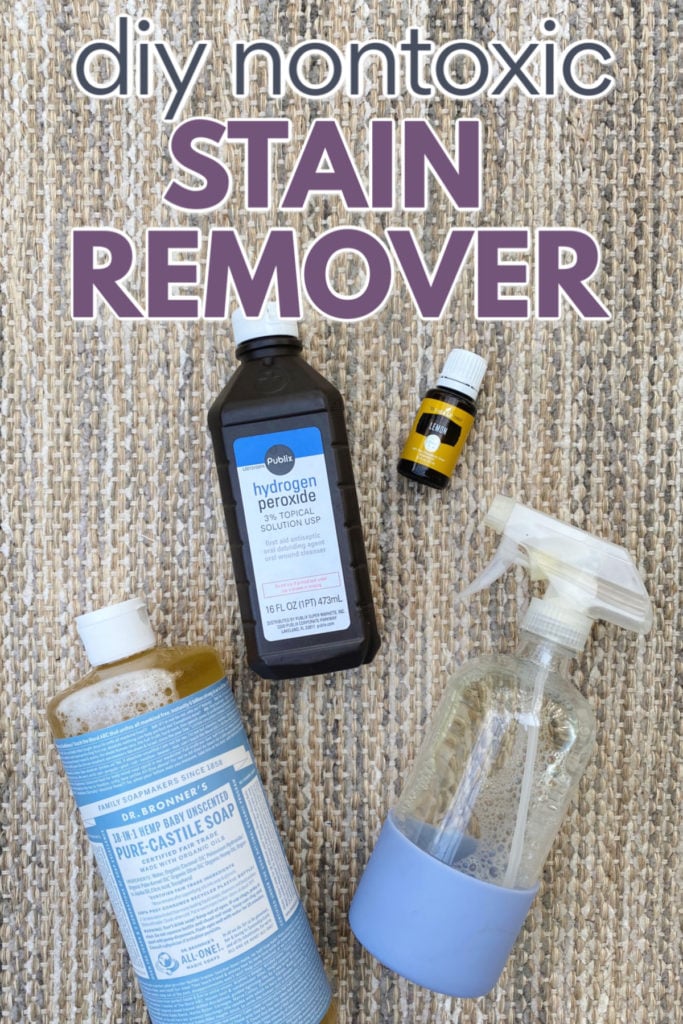
Here’s what I use. You can find other brands of Castile soap, but Dr. Bronner’s is my favorite. It’s also available now in a cardboard refill so you can avoid the single-use plastic.
Ingredients
- 1 part Dr. Bronner’s Liquid Castile Soap
- 2 parts Hydrogen Peroxide
- 1-2 drops Lemon Essential Oil
Directions
Note: Test a small area before applying to entire garment, upholstery, etc. because peroxide can occasionally affect the color.
- Mix or swirl ingredients together and spray or pour directly on stain
- Let it sit for about a minute, then gently rub the fabric together.
- Dirt stains will generally start to fade right away.
- Grass stains take maybe 5 minutes of soaking / gently scrubbing the fabric against itself. If the stains are old or have been through the dryer, you might need to brush with a laundry brush or dish brush.
Then I wash with a gentle, natural laundry soap (right now I’m obsessed with Zum’s Indigo Wild aromatherapy laundry soap) and hang to dry. I don’t usually put baseball pants in the dryer – just in case I’ve missed a stain, because the dryer heat tends to set them forever.
Safety Note on Storage
I’ve never mixed a full spray bottle of this DIY stain remover. I generally add enough of the mixture to last a week or two and keep it in a large glass spray bottle. It’s worth noting that the combination of Castile soap and hydrogen peroxide could create pressure inside a bottle if left unopened for long periods of time.
So, it’s probably best not to keep this mixture on hand long-term in a sealed storage container.
More Natural Stain Removal Hacks
Of course, there are other stains that can happen with life. Here are some additional ways to treat stubborn stains naturally.
Chocolate stains
Allow chocolate to harden and scape off as much as possible with a butter knife. It can help to put the garment in the fridge to allow the chocolate to harden.
An enzyme pre-treatment is best for chocolate, but if you don’t have one handy, use hot water. Run hot water through the back side of the fabric (it may take a few minutes) to melt the remaining chocolate and force it out the way it came in. When you’ve gotten out as much as possible, saturate the area with dish detergent and let it sit for at least 10 minutes. Then gently rub the fabric to work the stain out.
Rinse the fabric. If the stain is mostly out, then launder in hot water and check the stain before the dryer. You may have to allow the garment to air dry to make sure it is gone. If the stain still remains, before the dryer you can try applying heavy cream (that’s right!) directly to the stain. Blot it on with a sponge and keep blotting on more if necessary until the stain disappears.
Grease stains
Try dish soap. Rub it in gently and let sit at least 10 minutes before washing. Check the stain after you wash before putting it in the dryer, and if necessary, retreat with dish soap again. You may have to hang dry the garment to make absolutely sure the stain is out. The dryer can set grease stains.
Another method for mild grease stains is to rub chalk on the stain or sprinkle with corn starch and let sit. Chalk and/or corn starch will absorb the grease out of the fabric and then will wash off.
Blood stains
Try to remove it while it’s still fresh. There are a few different methods to remove blood stains naturally.
Hydrogen peroxide is outstanding at getting blood stains out. It actually bubbles just like it does on a wound. Try a colorfastness test first with hydrogen peroxide in an inconspicuous area BEFORE applying to the stain, as hydrogen peroxide can damage some fabrics. Let the peroxide sit for 10-15 minutes or until the stain stops bubbling and rinse again in cold water.
If it’s a larger stain, the first step is to generously rinse the fabric in cold water. After rinsing thoroughly, apply a paste of salt and cold water and rub it into the stain, rinse and repeat until it’s gone.
Another option is saliva. If it’s a small stain, try spitting on it and letting it sit. The digestive enzymes in saliva will help break down the proteins in the blood. Let sit for 10-20 minutes, then soak the fabric in cold water. Do not use this method on silk, linen or wool, as the same protein-eating digestive enzymes may eat the fabric as well.
If you have natural stain removal tips, I’d love to hear them!
This article was originally published in 2014 and updated in 2026.
I plan to use Nature’s Glory pure Castile Soap on my baby’s stained clothes and I’m hoping it removes them easily while staying safe and gentle.
This stain remover works great but I keep having a problem with the bottles, I purchased dark brown glass bottles And if I leave the spray cap on open the leak and create residue around the bottle, but if I close the spray, it builds up pressure and when I open it, it explodes with foamy bubbles.
Hi Marcia,
Thanks for commenting here. Are you using a large or small bottle?
I’ve only ever used a large bottle and don’t think I’ve filled it up, but that makes sense about the pressure. If you have time to let me know the size of the bottle and if you’re filling it to the top, I can make an adjustment to the directions.
Thanks so much!
Amity
I plan to try this! THank you!
I am in the process of looking for a good stain remover!
I’ve been using this recipe for a few years, But I’m realizing that the solution leaks out of The spray bottle, in a very slow bubble up/ over way. It definitely happens If i leave the nozzle in the open position, but it will usually also happen if I turn it to the closed position. I’ve tried different bottles (glass and plastic), And it still happens. Has this happened To You?
Glad the recipe works for you, Natalie. I haven’t had that experience, but I keep the ingredients right by the laundry sink during baseball season because I usually have to mix up a little more. The rest of the year, I don’t have as many reasons to use it.
The bottle I keep it in is the blue bottle on the left in the photo, so it doesn’t have a trigger style sprayer. Maybe that’s the difference?
Thank you for this recipe and for your great sense of humor sprinkled throughout!!!!
Thanks, Kate 🙂
Have you tried this on colored clothes?
Very good question, Katie. I’ve only tried it on whites, but I’ll try an old shirt and see what the peroxide does. I’ll be sure to comment here and update the post.
Have you tried this on other clothing (not whites)?
Also CVS carries Dr Bonner’s at a competitive
price.
Target and whole foods carry Dr. Bonners soap.
Most things made up with Hydrogen Peroxide have to be made up each time. But if you do try to make this up ahead of time, made sure to use a dark bottle to store it in as the light breaks down peroxide.
M, I use the dollar general Totally awesome degreaser too! It is AMAZING! I have not tried it on clothes though. Great idea, I will!
The castile soap is purchased in a bottle as shown. It is liquid.I’m going to give it a try and make up a bottle of it to keep on hand. Too much trouble to make it up each time you want to use it.
Then I will decide which one works best, the dollar store degreaser or this!
The castile soap is a liquid.
Ever try Awesome? I buy it at the Dollar store, have even gotten mustard or of a white knit shirt!
I’d like to know the same thing. Also, do you grate the bar of castile soap, liquefy it and then measure it, or ??
In the given photo the Castille soap is in liquid form, so I think the measurements are of that.
Yes, as HopefullyHelpful said, I’ve used liquid Castile soap. We’re updating to make sure that’s clear 🙂
Do you make it up each time you need it, or will it still work if you make a whole spray bottle’s worth at a time and use it over the next few weeks?