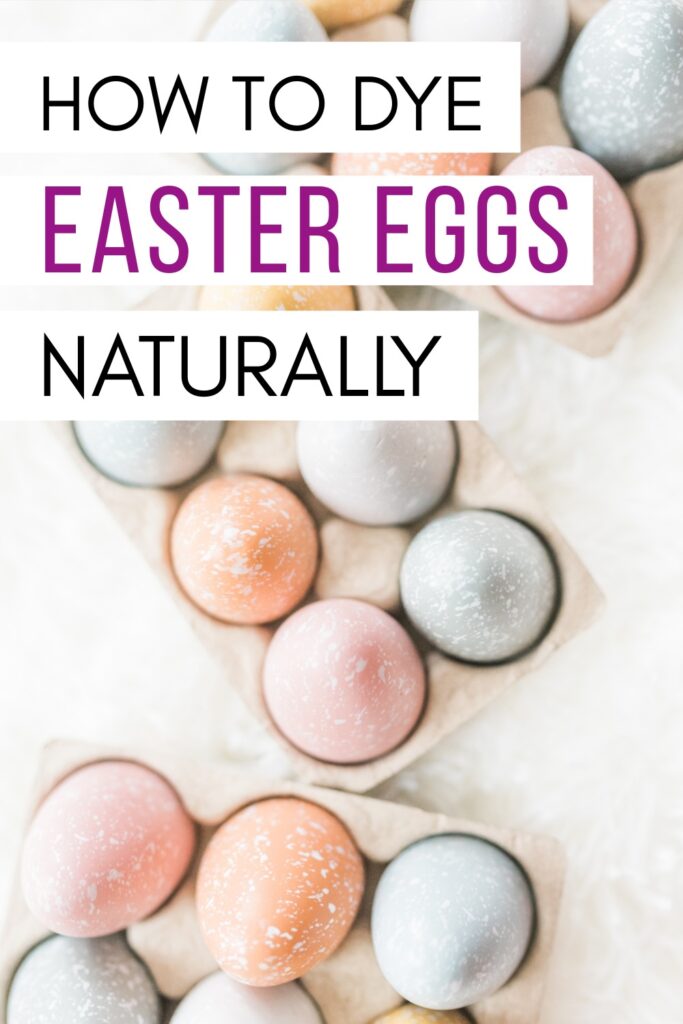
DIY Natural Easter Egg Dyes
Why should you go to the trouble of making your own natural Easter egg dyes? First of all – it’s fun! And secondly, even if you don’t eat the eggs you color for Easter, conventional dyes have chemicals that can get on kids’ hands (and all over the kitchen) during the process.
So, why mess with the fake stuff when Mother Nature makes beautiful colors all her own?
Many families are also looking for ways to reduce waste and limit exposure to synthetic food dyes and artificial colorants. Natural egg dyes offer a simple, hands-on way to celebrate Easter using ingredients you already have in your kitchen, garden, or maybe even your backyard.
How to Make Natural Easter Egg Dyes
Start with the colorful fruits and vegetables you already have on hand. If you see something on the list below, add it to your next shopping list. Here’s what you’ll need:
- fruits, veggies, and berries (for colors, see below)
- vinegar
- pots for boiling
- extra mason jars for coloring
- eggs
Which fruits and vegetables can you use to dye eggs?
Anything that, when boiled, will leave the natural pigment behind will work for coloring eggs. Part of the fun is experimenting with different fruits, vegetables, and even flowers! Don’t worry – we have a color list below.
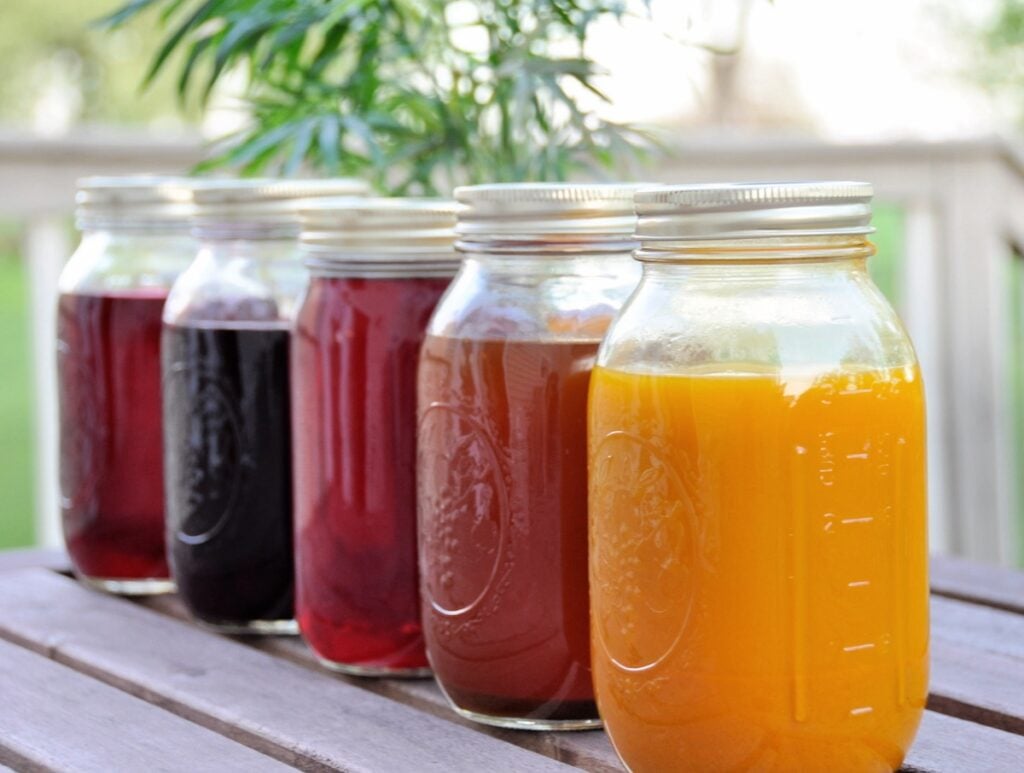
These nature dyes will set best if you boil the eggs in the same pot as the fruits and vegetables.
Start with hard-boiled eggs with clean shells. Don’t worry about exact measurements… feel free to estimate how much of each dye (see color chart below) to use.
How To Dye Eggs Naturally
- Except for spices, place a handful (or two or three handfuls) of a dyestuff in a saucepan.
- Add water at one inch above the dye stuff, or about 1 cup of water per handful of plants or dyeing material.
- Bring water to a boil and reduce the heat to low. Let simmer about 15 minutes to an hour (some need longer, listed below) until you like the color.
- Remove the pan from the heat.
- Pour mixture into a liquid measuring cup. Add 2 to 3 teaspoons of white vinegar for each cup of strained dye liquid. Pour the mixture into a bowl or jar that is deep enough to completely cover the eggs you want to dye.
- A slotted spoon works well to lift and lower eggs into the hot liquid. Leave the eggs in the water until you like the color.
The Best Natural Easter Egg Dye Recipes
Here’s how to get those gorgeous natural colors.
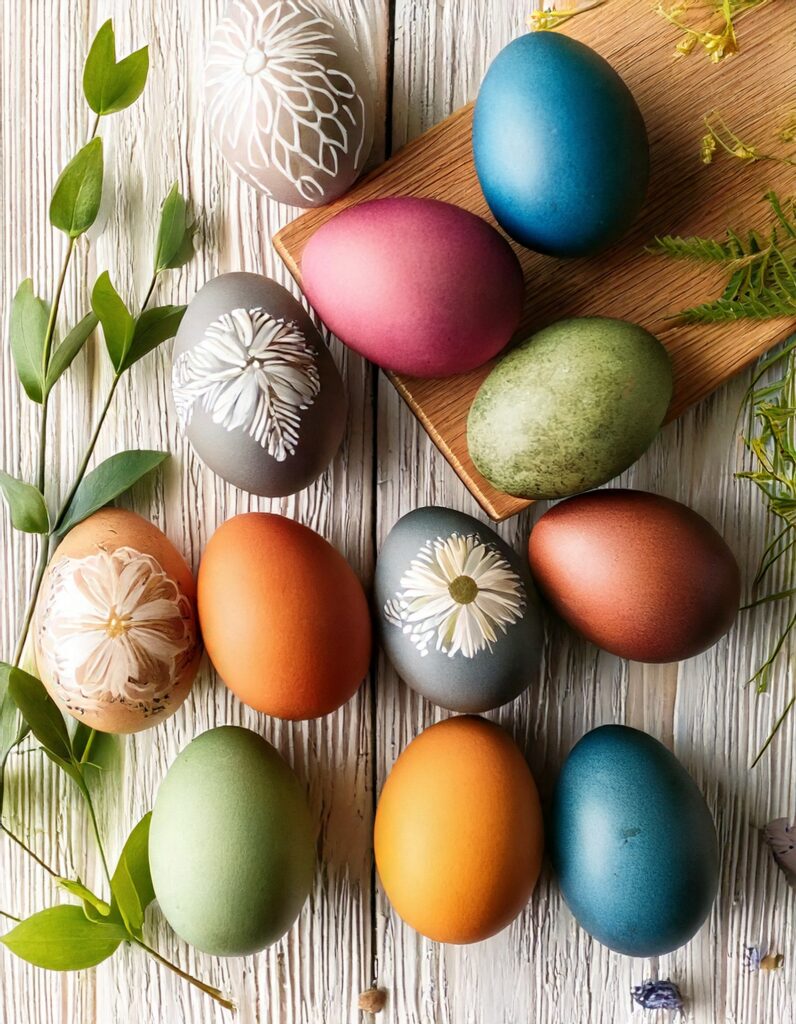
Reds/Pinks:
- beets
- hibiscus tea
- raspberries
- pomegranate juice
- freeze-dried strawberries
- cranberries
- red grape juice
- red onion skins
- frozen cherries
Blues/Purples:
- blueberries
- red cabbage
- butterfly pea tea
- red onion skins
- purple grape juice
- violet blossoms plus 2 tsp. lemon juice
Yellows/Golds:
- dill seeds
- yellow/brown onion skins
- chamomile tea
- marigold petals
- celery seed
- ground turmeric
- saffron
- green tea
Greens:
Be forewarned – green is a tough color to make. You might consider dipping an egg in yellow and blue.
- spinach (large amount, boil 1 hour)
- fresh basil
- organic liquid chlorophyll
- parsley – fresh leaves boiled long enough may give soft green hues
- nettle leaves – a good source of natural green when simmered well
- Matcha powder – can tint eggs a soft green, but usually works better if blended with another dye bath (like turmeric for a golden green).
The Best Colors Come with a Little Patience
Dyeing Easter eggs naturally is all about the experience. It’s fun, creative, and a bit of a slow art. Unlike those instant color tablets from a box, natural dyes take their time.
You won’t see bold, vivid hues in just a few minutes. The longer your eggs soak in the dye, the richer the color becomes. If you’re going for soft pastels, a quick dip might be just right. But for brighter, more vibrant shades, let them sit for much longer — even overnight in the fridge for maximum impact.
Play with Textures
For a textured look, dab the still wet egg with a sponge. Eggs colored with natural dyes have a dull finish and are not glossy. After they are dry, you can rub the eggs with coconut oil to give them a soft sheen. The dyeing process is filled with opportunities to experiment and improvise.
To add a little more decoration to your eggs try sprinkling salt over the egg as soon as you remove it from the dye bath. The color will pull away from the salt crystals and create a speckled or star-like pattern on the egg.
Nature-Print Patterns
Lay small leaves or flower petals against the egg and wrap tightly with cheesecloth or an old nylon stocking before dyeing. When removed, the plant creates a delicate silhouette on the shell.
Make it a Masterpiece
If your little ones want to show off their drawing skills, draw shapes, pictures, or inspiring words on the eggs with a crayon before dyeing. The wax won’t absorb the color so the designs will show through. Your crayon design will be accentuated by your choice of natural easter egg dyes!
Tie-Dye Fun
Rubber bands are all you need to make tie-dyed eggs. Wrap different sized rubber bands, one at a time, around the eggs. Make sure to leave some of the egg shell exposed so it can be dyed. Once the eggs are dyed to the color you like, remove them from the water and let them dry. Once dried completely, pull the rubber bands off to reveal the banded design.
Are Naturally Dyed Eggs Safe to Eat?
Yes. If you use food-based ingredients and keep eggs refrigerated. Natural dyes are made from fruits, vegetables, and spices, so they’re safe to handle.
For best food safety:
- Use eggs without cracks.
- Refrigerate if soaking longer than 1–2 hours.
- Eat within one week.
If eggs sit out at room temperature for long periods during decorating, treat them as decorative instead of edible.
Enjoy Your Non Toxic Easter Egg Dyes
We love dyeing eggs naturally for Easter or as a fun way to celebrate the first day of Spring. By skipping the traditional dye tablets you’ll not only be skipping on the artificial dyes, you’ll be creating less waste. No cardboard boxes to dispose of, no plastic wrappers, no stickers, and no wire egg dunkers.
Any waste created by your natural Easter egg dyes will be compostable and will naturally biodegrade in your waste pile.
Find more creative and fun Easter ideas here:
Think Outside the Basket – Creative Easter Basket Alternatives
Easter Coloring Pages for Kids
Healthier Easter Basket Filler Ideas
Nature Scavenger Hunt Ideas
Easter Snacks & Charcuterie Boards


Is there a way to store these dyes’s? We boil these vegetables and I would love to make the dye and save it for later use.
I haven’t tried to store them, but you may be able to refrigerate for a few days / freeze as you would that type of vegetable. We’ll try it next year. If you do, let us know 🙂
I tried using natural dyes for the first time this year and had a ton of fun! However, red onion skins don’t make red or blue eggs…they turn out light green. I’m not sure how, but they produce a lovely shade of green. I just simmered the skins in water for about 15 minutes then drained them.